

|
This section provides information for quickly setting up a secure DCOM connection between a MiScout OPC Server and MiScout OPC Client running on Microsoft Windows XP Service Pack 2 or later. This can be especially useful when configuring remote communication via OPC DA protocol from the MiScout Server to OPC Server.
Distributed Component Object Model (DCOM)
DCOM is an extension of Component Object Model (COM) allowing COM components to communicate among objects on different computers. DCOM uses Remote Procedure Call (RPC) to generate standard packets that can be shared across a network, which in turn allows COM to communicate beyond the boundaries of the local machine.
Because DCOM poses a security threat, care should be taken not to expose more than what is required for the application. Although multiple security layers exist, it is still possible that some part of the system will be compromised.
OPC Enumerator (OPCEnum)
MiScout OPC Server stores OPC specific information in the registry. Since MiScout OPC Clients need to be able to discover servers running on both the same machine and remote machines, there has to be a standard method for accessing this registry information (which, however, is not available for remote access). To do so, a component called OPC Enumerator (OPCEnum) is provided by the OPC Foundation. OPCEnum is an executable software application, which runs as a System service. It is typically installed on a personal computer along with the MiScout OPC Server. OPCEnum gives information about each OPC server residing on a PC. Afterwards, OPCEnum retrieves the list of available MiScout OPC Servers and exposes this list to MiScout OPC Client.
To ensure that an OPC connection is secure, create users and groups that are exclusively for this use. These can be manually added by any user having proper credentials to do so.
Domains and Workgroups
When working within a workgroup, each user will need to be created locally on each computer involved in the connection. Furthermore, each user account must have the same password for authentication to occur. A blank password is not valid in most cases. Because changes may need to be made to the local security policy on each PC, remote connectivity within a workgroup has the potential to be the least secure connection. For more information, enter "Local Security Policies in Windows" in e.g. Google search.
When working within a domain, it is not required that local users and groups are added to each computer. A domain uses a central database that contains user accounts and security information. If working within a domain is preferred, a network administrator may have to implement the changes.
Mixing domains and workgroups will require both computers to authenticate with the lesser of the two options. This means, that the domain computer will require the same configuration as it would, if it were on a workgroup. Local user accounts must be added to the domain computer.
Adding a Local User
1. Launch the Local User and Groups snap-in, which is part of the Microsoft Management Console. It can be viewed directly by selecting Start => Run and then typing "lusrmgr.msc".
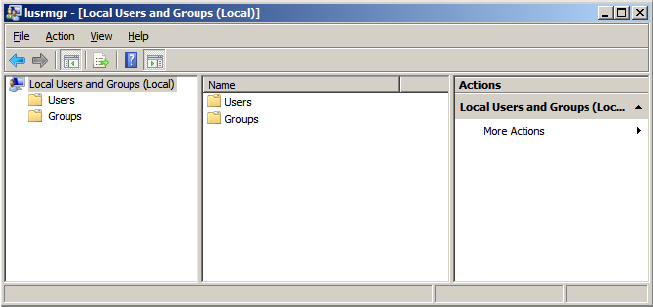
2. Next, click Users. Then, select Action => New User.
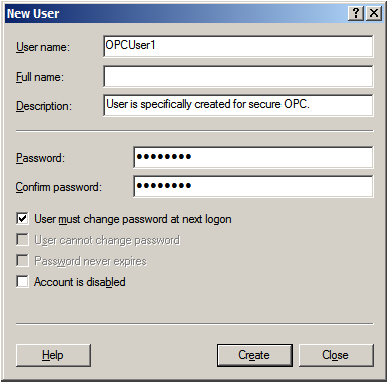
3. Type the appropriate information in the dialog box.
4. Change the following options as required:
5. Click Create. Then, click Close.
Adding a Local Group
1. Launch the Local User and Groups snap-in, which is part of the Microsoft Management Console. It can be viewed directly by selecting Start => Run and then typing "lusrmgr.msc".
2. Click Groups and then select Action => New Group.
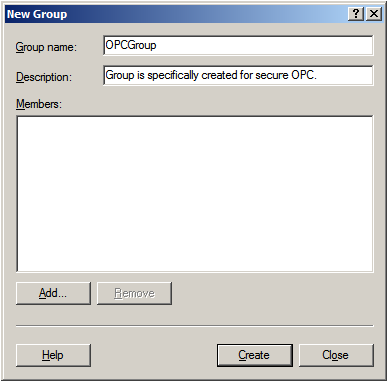
3. In Group name, type a name for the new group.
4. In Description, type a description of the new group.
5. Click Create and then click Close.
Adding Users to a Group
1. Launch the Local User and Groups snap-in.
2. Next, select Groups. Then, right-click on the group in which a member will be added and point to All Tasks. Click Add to Group => Add.
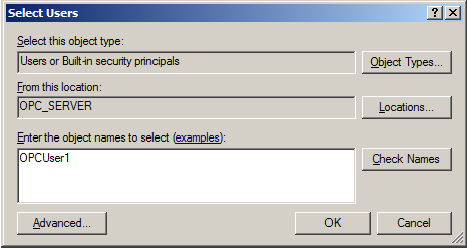
3. In Object Types, select the types of objects to find.
4. In Locations, click the domain or the computer that contains the users to add. Then, click OK.
5. Type the name of the user or group that will be added to the group and then click OK. To validate the user or group names being added, click Check Names.
Prior to configuring DCOM on the server computer, both the level of security and the Runtime's process mode should be considered. To provide the highest level of security, users have to enable the appropriate settings. The process mode should be chosen, since the DCOM configuration is reset after changing the process mode.
OPC Connection Security
To provide the highest level of security, DCOM must be enabled in the Runtime. This option (which is enabled by default) ensures that DCOM settings are obeyed and user authentication is performed. It is not recommended to disable this option, since the server will impersonate the client security when performing any actions on behalf of the client application.
1. Right-click on the server Administration icon in the system tray and then select Settings. If the Administration icon is not present, it can be accessed from the Start menu.
2. Select the Runtime Options tab.
3. Select the Use DCOM configuration utility settings check-box (if it is not already enabled).
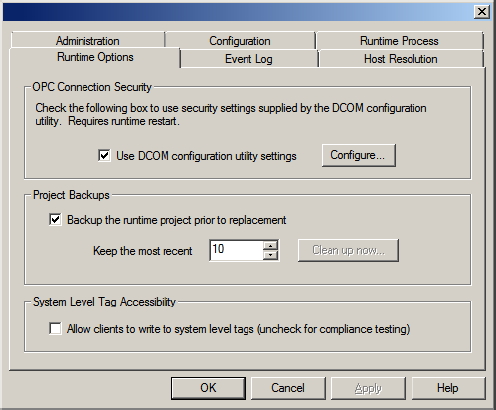
4. Click Apply or click OK.
Note: If prompted to restart the Runtime, choose Yes.
Process Mode
The server Runtime has the ability to run as a service or to run interactively under a user account. By default, the Runtime is installed as a service. In a few cases, however, it may be necessary to change the process mode to allow interactive functionality.
Warning! Application DCOM settings are reset when the server’s process mode is changed.
When remote OPC connections are required, selecting System Service Mode will produce the most predictable results. The Runtime will be started when the system starts and will not require user intervention. A specific user is not required to be logged on.
Using the Runtime in Interactive Mode may require additional DCOM configuration. The simplest way to authenticate the connection and prevent this additional configuration is to have a DCOM privileged user account logged on to the Windows operating system on both the server and client side. This user account must have the appropriate permissions set in the DCOM settings as described in DCOM Configuration.
Note. For some situations, extra DCOM configuration is required. For more information, refer to Configuring the Application Identity (Optional).
The computer running MiScout OPC Server must make changes to the application and system levels in order to setup DCOM correctly.
Configuring the Application
1. Launch the Component Services snap-in, which is part of the Microsoft Management Console. It can be viewed directly by selecting Start => Run and then typing "dcomcnfg".
2. Under Console Root, expand Component Services, Computers, My Computer and DCOM Config.
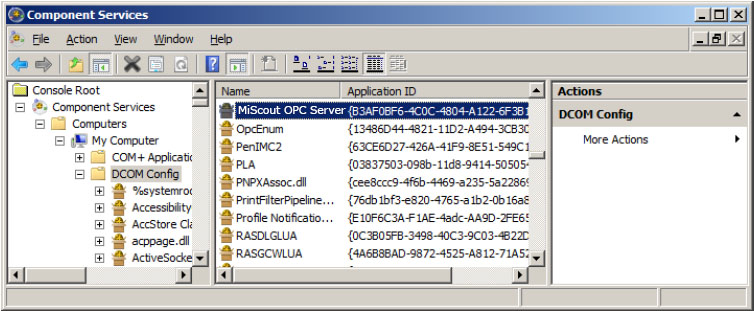
3. Browse the DCOM enabled objects until MiScout OPC Server application is located. In this example, “MiScout OPC Server” is displayed where the actual application name will appear.
4. Right-click the server application and select Properties.
5. Open the General tab. Next, make sure that the Authentication Level is set to Default.
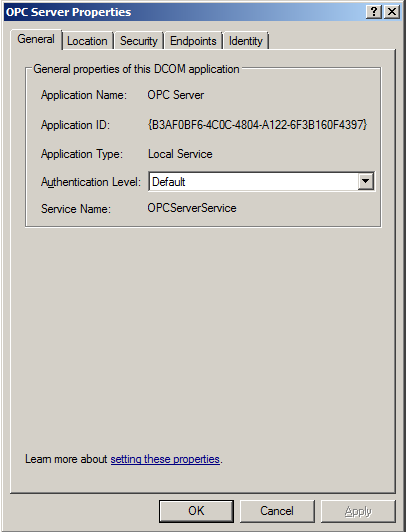
6. Open the Location tab. Then, make sure that ONLY ONE option called Run application on this computer is selected.
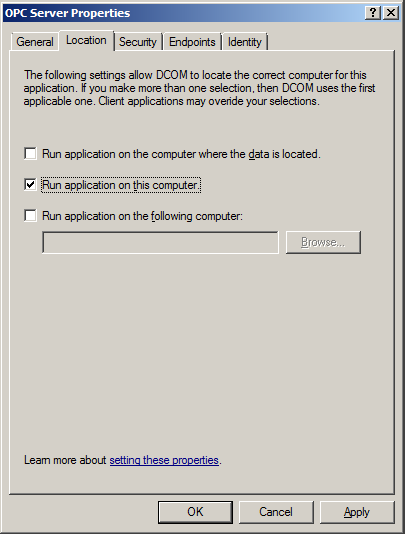
7. Open the Security tab.
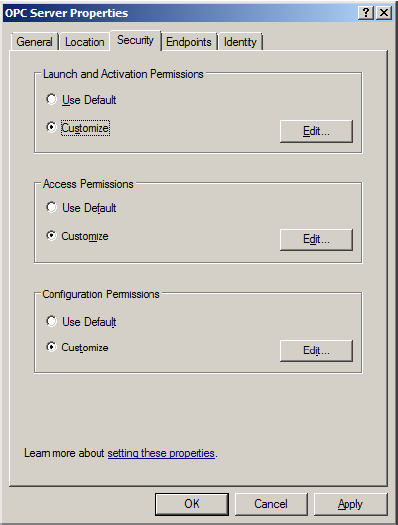
8. In Launch and Activation Permissions, select Customize. Here, users and groups can be granted a permission to start MiScout OPC Server, if it is not already running.
9. Click Edit.
10. In Launch and Activation Permissions, select Add.
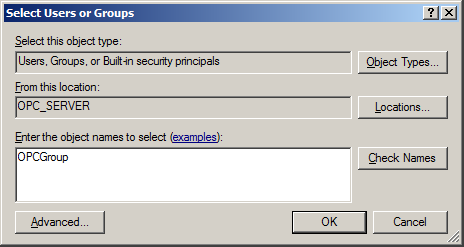
11. In Object Types, select the desired object type.
12. In Locations, click the domain or the computer that contains the users or groups that will be added. Then, click OK.
13. Type the name of the user or group in the window. To validate the user or group names being added, click Check Names.
14. After the account has been validated, click OK.
15. Continue to add users and groups until all the desired accounts have been added. The new account or group should be visible in the Group or user names list.
16. Next, select a new user or a group.
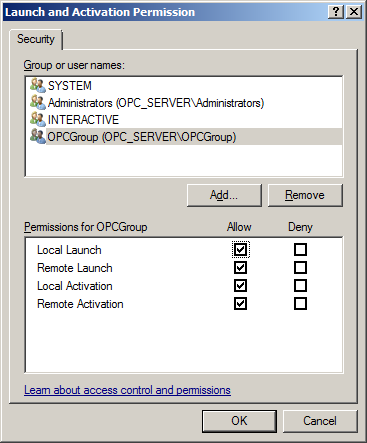
17. To allow only local applications to connect, enable only the local permissions for the account. In this example, local and remote permissions are enabled.
18. Repeat the process for all accounts that have been added. Then, click OK.
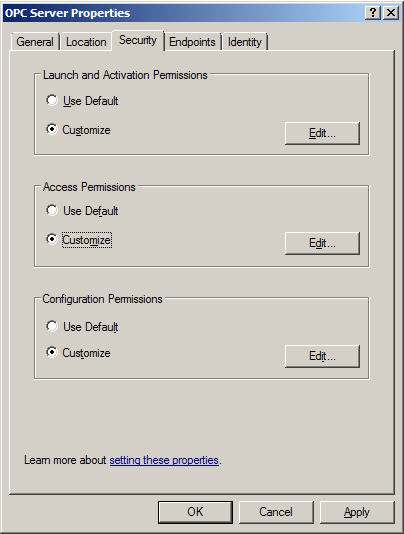
19. Select Customize in the Access Permissions group. Here, users and groups can be granted permissions to make calls to MiScout OPC Server. These calls include browsing for items, adding groups and items, or any other standard OPC call.
20. Click Edit.
21. In Access Permissions, select Add.

22. In Object Types, select the desired object type.
23. In Locations, click the domain or the computer containing users or groups that will be added. Then, click OK.
24. Type the name of the user or group in the window. To validate the user or group names being added, click Check Names.
25. After the account has been validated, click OK.
26. Continue to add users and groups until all the desired accounts have been added. The new account or group should be visible in the Group or user names list.
27. Select a new user or a group.
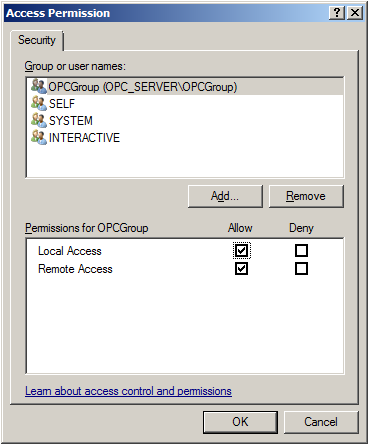
28. To only allow local applications to connect, only enable the local permissions for the account. In this example, local and remote permissions are enabled.
29. Repeat the process for all accounts that have been added. Then, click OK.
30. Click OK to close the Application Properties window.
The Identity needs to be set when the process mode is set to Interactive and one of the following conditions is present:
Setting the Identity to This user allows a specific user account to be selected to run the application. Clients are then directed to the account allowing to establish a connection to the server. The specified user is not required to be logged on to the Windows operating system in order for this to happen.
Note. In this case, the specified user must be part of the Administrators group. If not, the server will not start.
1. Launch the Component Services snap-in, which is part of the Microsoft Management Console. It can be viewed directly by selecting Start => Run and then typing "dcomcnfg".
2. Under Console Root, expand Component Services, Computers, My Computer and DCOM Config.

3. Browse the DCOM enabled objects until MiScout OPC Server application is located. In this example, “MiScout OPC Server” is displayed where the actual application name will appear.
4. Right-click on the server application. Afterwards, select Properties.
5. Next, select the Identity tab.
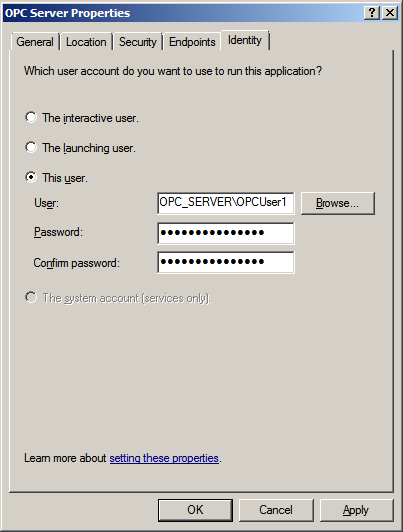
6. Enter the user name or click Browse to launch the Select User dialog to assist in selecting a valid user name.
7. Enter and confirm the password of the user who has been chosen to run the server application.
8. Select OK to close the Server Properties.
Configuring the System
1. Launch the Component Services snap-in, which is part of the Microsoft Management Console. It can be viewed directly by selecting Start => Run and then typing "dcomcnfg".
2. Under Console Root, expand Component Services and Computers.
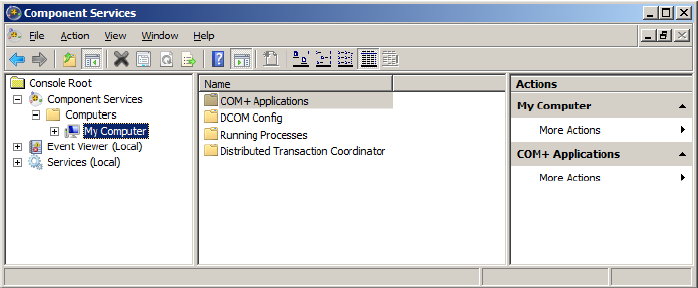
3. Right-click on My Computer and then select Properties.
4. Next, click the Default Properties tab.
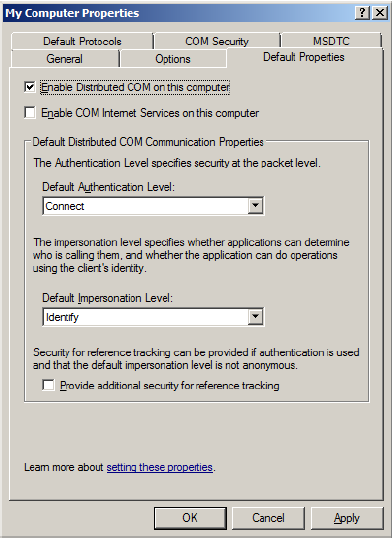
5. Verify that the Enable Distributed COM on this computer option is enabled.
6. Select Connect for the Default Authentication Level.
7. Select Identify for the Default Impersonation Level.
8. Next, click the COM Security tab.
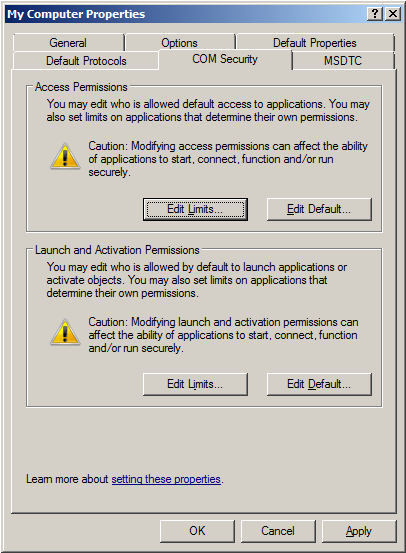
9. Select Edit Limits in the Access Permissions group.
10. Select the ANONYMOUS LOGON group account in the Group or user names list.
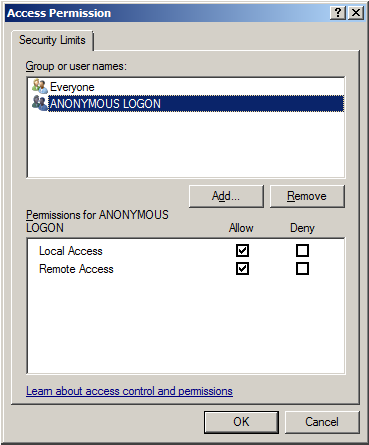
11. Enable the local and remote permissions for this group. OPCEnum overrides DCOM settings and opens accessibility to everyone. In Windows XP Service Pack 2 and above, this step is required because applications are not permitted to perform this action without user interaction.
12. Click OK to return to the COM Security tab.
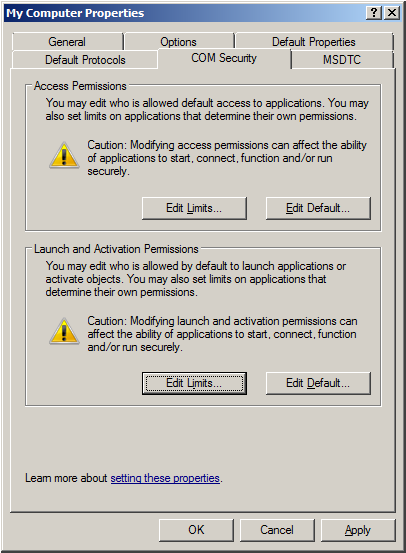
13. In the Launch and Activation Permissions group, select Edit Limits.
14. In Launch and Activation Permissions, select Add.

15. In Object Types, select the desired object type.
16. In Locations, click the domain or the computer containing users or groups that will be added. Next, click OK.
17. Type the name of the user or group in the window. To validate the user or group names being added, click Check Names.
18. After the account has been validated, click OK.
19. Continue to add users and groups until all the desired accounts have been added. The new account or group should be visible in the Group or user names list.
20. Next, select a new user or a group.
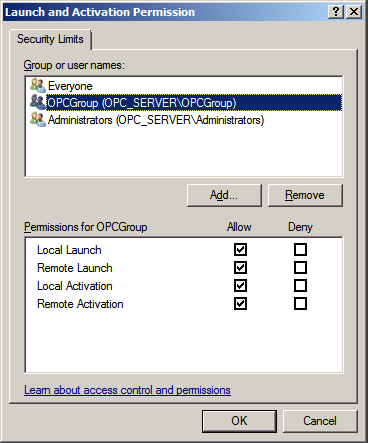
21. To only allow local applications to connect, only enable the local permissions for the account. In this example, local and remote permissions are enabled.
22.Repeat the process for all accounts that have been added. Then, click OK.
23. Click OK to close the My Computer properties window.
Applying Changes
After the DCOM settings have been modified, the changes made may not be applied immediately. While some operating systems require a reboot for DCOM changes to take effect, others will only require restarting the Runtime. To do so, right-click the Administration icon in the System Tray and then select Stop Runtime. Once the Runtime has stopped, the Start Runtime menu item will be enabled and ready for selection.
In some cases, it is easier to turn off any firewalls running on both the client and server machine prior to DCOM setup. Once a connection has been successfully created, it is recommended that the firewall security is restored and correct exceptions are added.
What is the Windows Firewall?
The Windows Firewall is the firewall service included with desktop and server releases of Microsoft Windows. Prior to Windows XP Service Pack 2, it was named “Internet Connection Firewall.” Its purpose is to drop incoming traffic that is not expected (unsolicited traffic) or traffic that does not correspond to the exceptions (excepted traffic) that are set within the firewall.
Note. Aside from the server computer, the firewall must also be set on client computer, so that callbacks can be received.
Server Side Exceptions
1. Launch the Windows Firewall by selecting Start => Run and then typing "firewall.cpl".
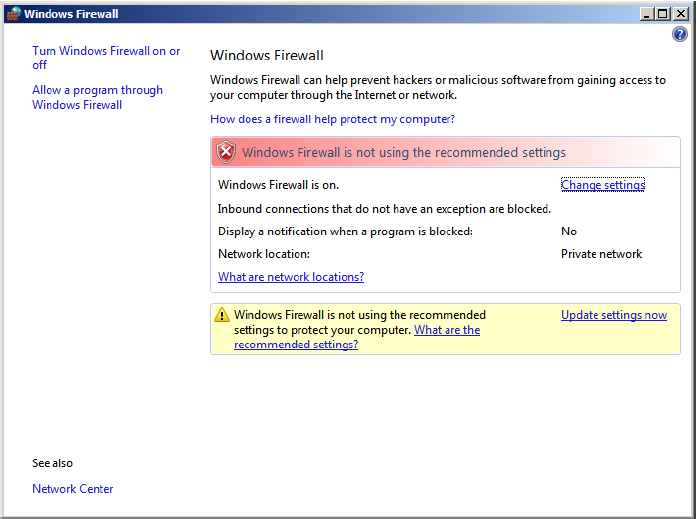
2. Windows Vista or Windows Server 2008 will not directly display the settings dialog. To view the dialog, select Change Settings.
3. Next, click the General tab.
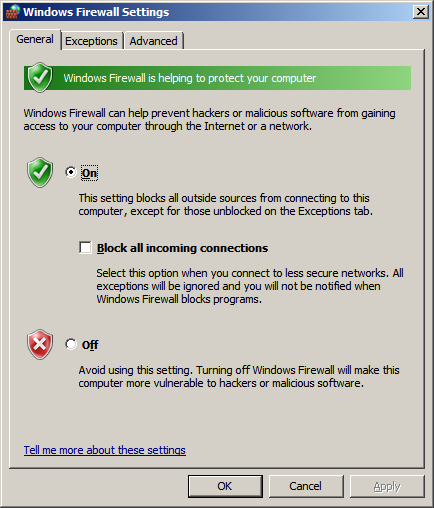
4. Verify that the firewall is enabled by choosing On.
5. Next, click the Exceptions tab.
6. Click Add program.
7. Click Browse and then locate OPCEnum.exe. This is located in C:\Windows\System32\.
8. Click OK.
9. Click Add program.
10. Next, select Browse and then locate MiScout OPC Server application's executable file. This is usually located in C:\Program Files\<company name>\<product name>\ or in C:\Program Files\product name>\.
Note In this example, a generic server name of “OPC_Server.exe” is used in order to apply to any MiScout OPC Server's configuration.
11. Click OK.
12. Click Add port.
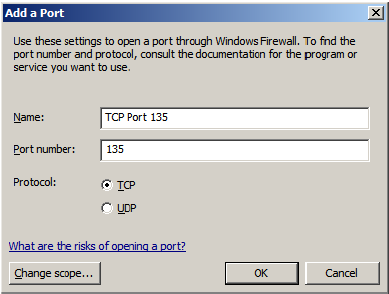
13. In Name, enter TCP Port 135. This port is commonly used for allowing clients to discover and utilize a DCOM service.
14. In Port number, enter 135.
15. Verify that the correct Protocol is selected. The default setting is TCP.
16. Click OK.
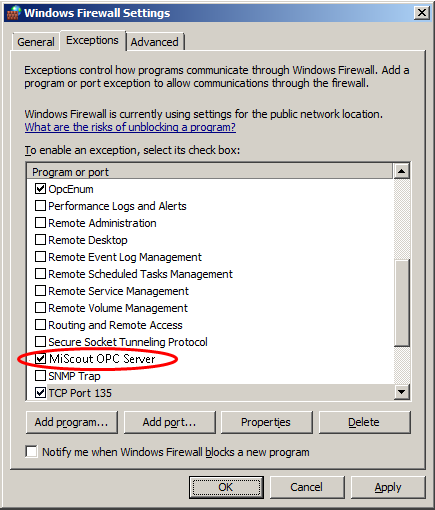
17. Click OK to close the settings dialog.
Client Side Exceptions
1. Windows Vista or Windows Server 2008 will not directly display the settings dialog. To view the dialog, select Change Settings.
2. Next, click the General tab.
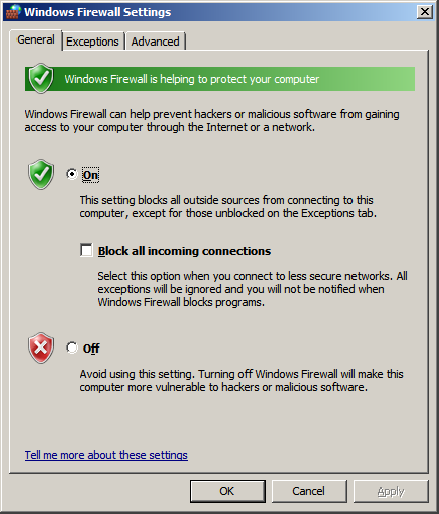
3. Make sure that the firewall is enabled by selecting On.
4. Next, click the Exceptions tab.
5. Click Add program.
6. Next, click Browse and locate the server application's executable file. In this example, MiScout OPC Client is used and is usually located in C:\Program Files\<company name>\<product name>\.
7. Click OK.
8. Next, click Add port.

9. Enter TCP Port 135 in the Name field.
10. In Port number, enter 135.
11. Make sure that the correct Protocol is selected. The default setting is TCP.
12. Click OK.
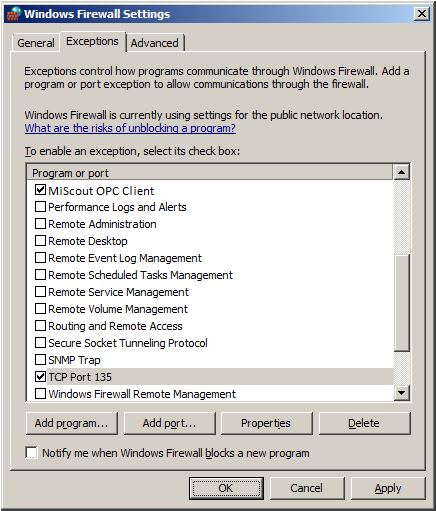
13. Click OK to close the settings dialog.
The Network Discovery setting was first introduced in Vista and allows or prevents the computer to see or be seen by other computers on the network. If the setting is off (or if it is not set as an exception in the firewall) MiScout OPC Clients might not be able to browse for the MiScout OPC Server.
1. Click Start => Control Panel => Network and Sharing Center.
2. Under the Sharing and Discovery section, click the Down Arrow in the Network Discovery row.
3. Select the Turn on network discovery radio button, and then click Apply.
4. If the state of Network Discovery displays Custom, it is because the firewall is not allowing for network discovery or because a required service (dnscache, fdrespub, ssdpsrv, and upnphost) is not running. While not all services are necessary, the firewall must be set correctly.
5. Launch the Windows Firewall and view the settings dialog.
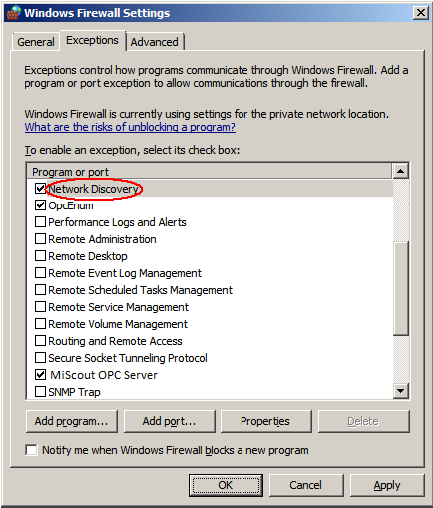
6. Search for Network Discovery in the list and make sure that the exception is enabled.
7. Click OK to close the Settings dialog.
In case the computers involved in the remote connection are part of a workgroup, editing the Local Security Policy might be required. This can pose as a security risk and should be performed only if it is absolutely necessary. In most cases, the server computer may require changes to the authentication model whereas the client computer needs to have access to browse for the servers.
Sharing and Security Model for Local Accounts
This setting defines the way local users will be authenticated. When the setting is set to Classic, remote logons will use the same level of access that is set for the local account; provided that it has the same username and password. If set to Guest only, network logons will use the same level of access that is set for the Guest account.
The Sharing and Security Model may need to be set to Classic on the server computer only. An error code (HR=80070005) will be returned to the client when attempting to add items ( in case this is required).
1. Launch the Local Security Policy snap-in, which is part of the Microsoft Management Console. It can be viewed directly by selecting Start => Run and afterwards typing "secpol.msc".
2. Under Security Settings, expand Local Policies.
3. Next, select Security Options.
4. In the list, right-click on Network access: Sharing and security model for local accounts and then select Properties.
5. Choose Classic – local users authenticate as themselves and click OK.
Let Everyone Permissions Apply to Anonymous Users
This setting determines the additional permissions that are granted for anonymous logons. When the option is disabled, the permissions granted to the Everyone security identifier do not apply to anonymous users. If the option is enabled, anonymous users are given the same permissions as the Everyone group.
The Everyone Permissions setting needs to be enabled on the client computer only. If clients cannot browse for the remote server even after DCOM has been set up, this setting is required.
1. Launch the Local Security Policy snap-in, which is part of the Microsoft Management Console. It can be viewed directly by selecting Start => Run and afterwards typing "secpol.msc".
2. Under Security Settings, expand Local Policies.
3. Select Security Options.
4. In the list, right-click on Network access: Let Everyone permissions apply to anonymous users and then select Properties.
5. Choose Enable and finally click OK.
Because OPC uses DCOM to allow remote communications, it is imperative that it is correctly configured. Users can create a secure connection by following the instructions in this document. For more information, refer to the OPC Foundation's support documentation at http://www.opcfoundation.org/.